• Skip to primary navigation
  • Skip to main content
  • Skip to primary sidebar
  • Home
  • Recipe Index

Suji's Cooking

Authentic Delicacies From A Malabari Kitchen

5 stars

Delicious Paneer Makhani Recipe: A Creamy Indian Delight

October 10, 2024 Indian Curry Recipes

Delicious Paneer Makhani Recipe: A Creamy Indian Delight

If you’re a fan of rich, creamy Indian curries, then Paneer Makhani is a dish you absolutely must try. This North Indian favorite combines soft paneer (Indian cottage cheese) with a luscious tomato-based gravy, spiced just right to create an irresistible flavor. Perfect with naan, roti, or rice, Paneer Makhani is sure to impress your family and friends.

The roots of Paneer Makhani can be traced back to the Mughal era, a period that profoundly influenced Indian cuisine. The Mughals were known for their lavish feasts, incorporating a variety of rich flavors, spices, and cooking techniques. Dishes prepared during this time often featured a luxurious use of cream, butter, and nuts, which can be seen in Paneer Makhani’s creamy sauce.

The term “makhani” itself means “buttery” in Hindi and Punjabi, reflecting the dish’s signature richness. While Paneer Makhani is often associated with the culinary traditions of North India, it is also believed to have originated in the Punjab region. This area is known for its agricultural richness, producing fresh dairy products that are central to Punjabi cuisine.

Another story is that the first paneer butter masala dish was conjured up in Delhi’s famous Moti Mahal restaurant chain; created for the British population of the time who had a strong liking for Indian curry but could hardly handle the spice.

To make the perfect Paneer Makhani or Paneer Butter Masala, you’ll need the following ingredients:

  • Paneer: This Indian cottage cheese is the star of the dish. You can buy it fresh or make your own at home.
  • Butter: As the name suggests, butter is essential for that creamy texture and rich flavor.
  • Cream: Adds a luxurious feel to the gravy.
  • Tomatoes: Fresh or canned, tomatoes are the base for the gravy, providing acidity and sweetness.
  • Onions, Garlic and ginger: For depth of flavor.
  • Spices: kashmeeri red chili powder,whole spices create a symphony of flavors.
  • cahews:For the extra richeness of the gravy

Over the years, Paneer Makhani has gained immense popularity, becoming a staple in Indian restaurants around the globe. Its creamy texture and mildly spiced flavor make it appealing to both Indian and non-Indian palates. The dish is often enjoyed at weddings, festivals, and special occasions, symbolizing the warmth of Indian hospitality.

So Let’s dive into this delightful recipe!

Print Recipe
Delicious Paneer Makhani Recipe: A Creamy Indian Delight
soft paneer (Indian cottage cheese) with a luscious tomato-based gravy, spiced just right to create an irresistible flavor. Perfect with naan, roti, or rice, Paneer Makhani is sure to impress your family and friends.
Delicious Paneer Makhani Recipe: A Creamy Indian Delight
Course Main Course
Cuisine Asian, Indian
Prep Time 10 minutes
Cook Time 30 minutes
Servings
portion
Ingredients
  • 2 tbsp unsalted butter
  • 1 medium size onion roughlychopped
  • 1 small piece ginger sliced
  • 2-3 cloves garlic
  • 5 medium red tomatoes sliced
  • 1 bay leaf
  • 1 small piece cinnammon stick
  • 1 black cardomom
  • 2-3 cloves
  • a handful cashew nut
  • 1/4 tsp turmeric powder
  • 1 + 1/4 tbsp cashmeeri chili powder
  • 300 ml water
  • 2 green chili sliced lengthwise
  • 250 g paneer
  • 3-4 tbsp fresh cream
  • salt as needed
  • 1/2 tbsp dried fenugreek leaves
Delicious Paneer Makhani Recipe: A Creamy Indian Delight
Instructions
  1. place a sauce pan or kadai over low flame ,add half tablespoon butter in to it. when the butter starts melting add roughly sliced onion to it and saute for a minute
  2. then add sliced ginger and garlic then saute for few seconds,then add sliced tomatoes .increase flame to medium and saute the tomatoes well for one to two minutes
  3. then add bayleaves,cardamom,cinnamon stick,cloves,a handful,of cashews then mix it well with tomtoes .then add one tbsp cashmeeri chili powder,1/4 tbsp turmeric powder and salt .mix it well with the tomatoes.
  4. then add water and mix well,cover with a lid and cook for 15 miutes (until cashew and tomatoes cooked well) over medium flame.
  5. once it cooked well switch off the stove ,let it cool down,then remove spices(cloves,cardamom,bayleaves,cinnammon )from the curry. then add this to a blender and grind to a smooth fine paste.then strain it through a strainer to get the silky smooth gravy.
  6. then heat the kadai over low flame,then add one tbsp butter,once butter starts melting add green chili,saute few seconds and add paneer cubes and fry it lightly. then remove the paneer from the pan or you can gently push it aside of the pan,then add kashmeeri chili powder.
  7. saute it for few seconds and pour the smooth silky gravy in to it, stir well and cook for few minutes.check salt consistency add if needed then add sugar in to it.then add paneer cubes .gently mix it with the gravy.
  8. then cook for a minute,then add the crushed Kasuri methi(dried fenugreek leaves),gently mix it with the curry,switch off the stove then add cream mix gently and throughly with out breaking the paneer cubes. serve hot with nan or basmathi rice
Semiya Upma Recipe/Vermicelli Upma Recipe

September 15, 2023 Beginner

Semiya Upma Recipe/Vermicelli Upma Recipe

Upma is a very popular and traditional South Indian breakfast usually making with semolina,vermicelli ,oats or broken wheat.It is a very tasty and savory dish.Today I am posting the recipe of my favorite upma called Semiya Upma Recipe/Vermicelli Upma Recipe.

what is vermiceili or semiya ?

Vermiceli is a traditional type of pasta round in section similar to spagetti.In English-speaking regions it is usually thinner than spaghetti while in Italy it is typically thicker.

The first mention of a vermicelli recipe is in the book De arte Coquinaria per vermicelli e maccaroni siciliani (The Art of Cooking Sicilian Macaroni and Vermicelli), compiled by the famous Maestro martino da como.

In countries of the Indian subcontinent vermicelli is made from whole wheat flour or all-purpose flour or semolina or rice flour or ragi flour. its available either as long strands or cut into about 2 cm long pieces.   The noodles are used in a number of dishes including a variation of kheer, a sweet dessert similar to rice pudding . Vermicelli are also used in many parts of India to make a popular dish called “upma”. While making semiya upma, I always prefer semiya made from whole wheat flour or ragi flour as they are more healthy than the ones made from rice flour or all purpose flour.

whats Upma ?

Upma is a savory breakfast dish very popular in South India it is usually made with various ingredients like semolina, oats, millets, quinoa, bread, or poha (flattened rice)etc. these ingredients are cooking with different vegetables and spices.it is usually serving with tea as a breakfast dish.

how to cook vermicelli?

Same like rice we can cook vermiceili in two ways one is the absorption methode were we can cook one cup of roasted semolina in one and quarter cup of water ,the semolina will absorb the water and the other one is using plenty of water to cook the vermiceili and drain the water completely.its always better to roast the vermicelli before cooking so it will not be soggy after cooking

check my youtube for video recipe:-

Print Recipe
Semiya Upma Recipe/Vermicelli Upma Recipe
Vermicelli or semiya upma is a very popular and traditional South Indian breakfast usually making with semolina,vermicelli ,oats or broken wheat.It is a very tasty and savory dish.
Semiya Upma Recipe/Vermicelli Upma Recipe
Course Breakfast
Cuisine Asian, Indian, Kerala, South Indian
Keyword upma recipe ,south indian breakfast recipes
Servings
3
Ingredients
  • 1 cup vermicelli
  • 3 1/2 tbsp oil
  • 1 tsp mustard seeds
  • 1 tsp blackgram
  • 1 tsp chana dal
  • 1 tbsp peanuts
  • 2 red chili whole
  • 1/2 sprig curry leaves
  • 1/2 cup onion chopped
  • 1 tsp ginger chopped
  • 2 1/2 tbsp carrot chopped
  • 2 1/2 tbsp beans sliced
  • 2-3 tbsp green peas
  • 2-3 green chili sliced
  • 1/2 tsp turmeric powder
  • salt as needed
  • 1 tbsp chopped coriander leaves
  • 1 tsp lemon juice
  • 6 cup water to cook semiya
Semiya Upma Recipe/Vermicelli Upma Recipe
Instructions
  1. Heat oil in a non stick pan over medium heat, once oil become hot add vermicelli and roast it until it become slightly golden.then transfer it to a wide plate and let it cool.
  2. Mean time boil six cups of water in a vessel once the water started boiling add salt then check the salt consistency and add roasted semolina.
  3. stir well ,cook for 3-4 minutes. once vermicelli cooked well ,switch off the stove and strain the water completely .spread it with a fork and keep it aside.
  4. now heat oil in a kadai .once the oil become hot add mustard seeds,when mustard seeds started to splutter add curry leaves ,urad dal,chana dal and pea nut. roast well then add red chili and saute well.
  5. then add onion and saute well till it become transparent ,then add all other vegetables and green chili saute well for 2 minutes over medium flame,then add ginger and turmeric powder and saute well.
  6. then reduce the flame and cover the pan with a lid and cook until the vegeables cooked well.
  7. once vegetable cooked well remove the lid and saute it in high flame for two minutes,then add cooked vermicelli and mix well .once done switch off the flame .
  8. add a dash of lemon juice and coriander leaves.mix well and serve hot.

May 2, 2023 Chicken Recipes

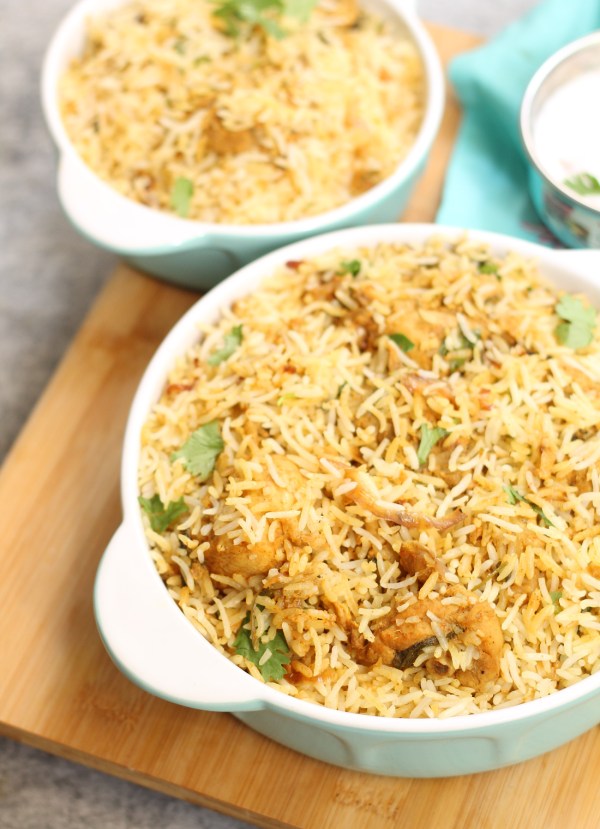
Hyderabadi Chicken Dum Biryani

Today I am here with a favorite biriyani of my son he loves this biriyani very much.its the king of biriyanis known as Hyderabadi biryani.This is a special kind of biryani from Hyderabad, Telangana, India now very popular in all over India.This aromatic and flavorful whole meal is delicious and is perfect for any occasion.

Every region has its own style of biryani,I have already posted many kind of South Indian biriyanis like Kozhikodan biriyani,Ambur biriyani,Thalassery biriyani etc

This Hyderabadi dum biriyani is a mouth watering combination of Aromatic Basmati rice layered over succulent pieces of chicken cooked with homemade spices, yogurt and fried onion then sealed and dum cooked to perfection 😋

What type of chicken is best for making biriyani ?

I always prefer fresh chicken with bone because it tastes so good .cut chicken in to medium pieces and wash it with salt and water so u can avoid the raw taste and smell of chicken.

spices:- I always use freshly ground spices so the taste and aroma will be greater but the packed biriyani masala works well too.Adding some whole spices while cooking rice will enhance the flavor.

Herbs:-Try to use fresh coriander leaves and mint leaves because Fresh herbs works better than dried or frozen one .

Onion:-One of the most important ingredients of a delicious biriyani is onions especially in this biriyani caramelized onions.

Salt and ghee:-these are two another important ingredients.both are taste enhancers .If your rice lacks in salt biriyani is going to be tasteless.to know the salt is enough in water for cooking rice always taste the water, it should have a soupy salt level.while choosing ghee always prefer genuine brands or home made ghee.

Which rice is best for making Hyderabadi Biriyani ?

Rice is one of the most important ingredients for preparing a delicious biriyani.It has to be a good quality aromatic aged long grain basmati rice.

Why you should always rinse rice ?

Wash rice with cold water several times before soaking.rice contains starch particles, dust and pesticides washing will help to remove all this. Rinse the rice in normal water several times.At first you can see a lot of starch and the water will be in white color because wash until the water become clear .The clarity of the run off water indicate most of the starch removed so the rice will not be very sticky after cooking.If you don’t wash rice well it will stick each other once cooked and it will result mushy rice and a gummy texture.

Why you need to soak your Basmati rice?

Its very important to soak washed Basmati rice for about 20 -30 minutes in normal water.soaking will help the rice to absorb some water so you can save the cooking time and flavor.soaking will give maximum, length to the grain so you will get beautiful texture.

How to cook basmati rice ?

You can cook basmati rice in two ways one is Boiling method and other is absorption method .In boiling method boil ample pot of water with sufficient salt and whole spices like cinnamon ,cardamom ,cloves and bay leaves also add one teaspoon of lemon juice and two tablespoons of sun flower oil so the rice wont stick to each other also lemon give freshness.Once the water boiled well add rice and cook till 75% or 90%done depends on what kind of biryani you are cooking and what type of rice you are using(aged rice or not, long grain or short grain etc.)Once done drain the water and spread the rice in a flat vessel.Slightly spread it using a fork.for checking the rice s cooked or not just press it in between your thumb and finger if it breaks in to two parts its done(its called 2 kani chaval).In absorption method always be careful use 1 3\4 or 2 cup water for 1 cup rice or its always better to follow the package instruction.

How much is the ratio of meat and rice when making biriyani?

The usual ratio is 1:1 meat to rice but it depends on peoples preferences like how they want the biriyani to be.meat/chicken or rice more.for meat lovers can use 1kg chicken/meat and 750 g rice for rice lovers can use vise versa.but the normal ratio is 1 kg meat/chicken for 1 kg rice.

How to cook meat/chicken for biriyani?

Succulent pieces of meat/poultry is a main attraction of the perfect biryani.if you are using chicken or meat marinate it 30 minutes to maximum two hours before cooking.You can make gravy of biriyani few hours or a day ahead.the gravy and the chicken or meat should be thick and juicy

The process of Dum

Dum or steaming is the most important process of making biriyani.In this process rice completely absorbs the flavors from gravy and the rice becoming very moist and flavorful .Fort this magic to happen we need to completely trap the steam inside the cooking pot so the rice can puff up in the aroma filled steam. For this we usually cover the edges of the coking vessel with roti dough or you can use aluminum foil to cover the pot then place a lid and a place a weight on top.The dum cook for 30 -35 minutes over very low flame .

Accompaniments:Accompaniments are must with any biriyani .Pappad, Raita, pickle ,kachumber salad and mint chutney are usual accompaniments.

Print Recipe
Hyderabadi Chicken Dum Biryani
This Hyderabadi dum biriyani is a mouth watering combination of Aromatic Basmati rice layered over succulent pieces of chicken cooked with homemade spices, yogurt and fried onion then sealed and dum cooked to perfection 😋
Course Main Course, Main Dish
Cuisine Asian, Indian
Servings
people
Ingredients
Ingredients for Biriyani Masala
  • 15 numbers cloves
  • 2-3 large pieces of cinnammon
  • 10-15 pods of cardamom
  • 2 pods of black cardamom
  • 3 bay leaves
  • 1 small mace
  • 1/4 part of one nutmeg
  • 3 star anise
  • 2 tbsp coriander seeds
  • 1 tsp fennel seeds
  • 1 tsp caraway seeds
  • 1 1/2 tsp black pepper
Ingredients for Biryani
  • 1 kg chicken cut in to medium pieces (8-10)
  • 1 kg basmati rice
  • 2 large onion if medium size use 3 thinly sliced
  • 2 tsp chili powder
  • 3/4 tsp turmeric powder
  • 1 tbsp crushed green chili
  • 1 tbsp garlic paste
  • 1 tbsp ginger paste
  • 1 cup yogurt
  • 1 tbsp lemon juice
  • 1 handful mint leaves chopped
  • 1 handful coriander leaves chopped
  • salt as needed
  • ghee
For cooking Rice
  • 2-3 cardamom
  • 1 bay leaves
  • 1 small piece cinnammon
  • 2-3 cloves
  • 2tbs lemon juice
  • 3-31/2 Ltr water to cook the rice
  • salt as needed
  • 2tb oil
For garnishing
  • 4-5 tsp ghee
  • 2-3 tbsp saffron milk mix few strands of saffron in warm milk and use
  • 2 tbsp oil Preferably the oil which we fried onions
  • 2 pinch of biryani masala
  • a handful of fried onion
Instructions
  1. In a mixer add all ingredients for biriyani masala and grind in to a smooth powder .keep in an air tight container.
  2. In a large mixing bowl, add cleaned and washed chicken pieces make sure the water is completely drained.combine chicken with biryani masala, ginger garlic paste, crushed green chili, yogurt, chili powder, turmeric powder, salt and lemon juice . then add coriander and mint leaves, gently mix it with chicken and keep it aside.
  3. Rinse rice several times times in lots of water until it is clear. then Soak washed basmati rice in water for 20-30 minutes
  4. Mean time Heat oil in a wide frying pan over medium heat.once the oil become hot add thinly sliced onion and fry it until it become golden in color ,set it aside.(Fry onions in batches. Do not crowd the pan.)
  5. then in a large, wide and thick bottom vessel boil 3-3 1/2 Ltr of water to cook the rice.Once water started boiling add sufficient salt, cloves, bay leaf, lemon juice, cardamoms and a piece of cinnamon in to it.once it boiled well add two tbsp sunflower oil and washed rice in to it.cook until rice become soft and two kani chaval consistency(70%cooked).then drain water completely.then spread the rice in a wide pan if needed.
  6. Transfer chicken with marinade to a large , thick-bottomed vessel, add 3/4 of fried onion to the chicken.mix well .spread it evenly at the bottom .then layer all the cooked rice .Top with fried onions and ghee.and two three teaspoon of fried onion oil (optional) and saffron milk.then sprinkle two pinch of biryani masala .Then seal the top with atta dough or aluminum foil, cover with a lid and place a weight on top of the lid and cook in a low flame for 30 minutes.then switch off the stove rest for ten minutes .serve hot
Recipe Notes

notes:If you are afraid to layer rice with uncooked chicken you can cook the chicken and rice separately   then layer it and do dum cooking for just ten minutes ,that will also work i do that most f the time.


use ghee according to your preference i used very less here

Vattayappam/vateyappam recipe

March 5, 2020 BREAKFAST RECIPES

Vattayappam/vateyappam recipe

Hi, today I am here with a very popular Vattayappam/vateyappam recipe. Vattayappam is Kerala’s favorite steamed rice cake and its very popular among all over Kerala. This is a healthy snack very easy to digest,light and delicious.

Vattayappam is basically a rice based tea time snack. The main ingredients are rice, coconut,yeast, sugar and cardamom. Rice and coconut grind together and fermented with yeast. Its a very soft spongy and slightly sweet cake. perfect for tea time.its a classic Kerala tea time snack.

So here is the recipe of traditional vattayappam try it and enjoy..

Print Recipe
Vattayappam/vateyappam recipe
Vattayappam is Kerala's favorite steamed rice cake and its very popular among all over Kerala. this is a healthy snack very easy to digest,light and delicious.
Vattayappam/vateyappam recipe
Course Appetizer, Breakfast, Snack
Cuisine Indian, Kerala
Prep Time 15 minues
Cook Time 20 minutes
Servings
people
Ingredients
  • 2 Cup White Rice/ponni pachari/idli rice
  • 1 medium coconut grated
  • 1/2 Teaspoon Instant Yeast
  • 8 tbsp sugar
  • 1/2 tsp Cardamon powder
  • 1 cup coconut water optional
  • oil to grease the mold
  • salt 2 pinch
Vattayappam/vateyappam recipe
Instructions
  1. Soak washed rice for about 4 hrs in cold water , Then wash well, drain and keep aside. Soak yeast with 3 tbsp luke warm water and 1 tsp sugar and keep aside.
  2. from the soaked rice take 2 tbsp rice and grind it in to a coarse powder (consistency of put powder)
  3. in a sauce pan add 1 cup water and mix the rice powder in to it.bring it to boil over medium flame .Stir continuously until you get a porridge consistency. switch off the stove and keep it aside to cool. this is locally called kappi kachuka.
  4. Then add half of the coconut in to a blender add 1/4-1/2 cup lukewarm water. blend well then extract coconut milk and keep it aside.Once the kappi become cool add this to the coconut milk mix well and keep aside.
  5. Then Add soaked rice and remaining coconut, into a blender. Add one cup coconut water or normal water in to it (be careful while adding water as the batter should not become too watery). then grind well in to a smooth batter
  6. Transfer the batter into a large bowl . Add yeast , sugar and salt,coconut milk and kappi mix.Then mix well together.cover this with a lid and keep it in a warm place for 5-6 hours to ferment.once fermented add cardamom powder and gently mix.
  7. then grease a stainless steel plate or flat plate or idly mold with little oil. Then spoon in the fermented batter to the plate. (if you prefer garnish with raisins and cashews.)Steam cook for 15 to 20 minutes.
  8. 5. Once its done, let it cool and serve with tea
Restaurant style Gobi Manchurian Recipe

January 13, 2020 Side Dish

Restaurant style Gobi Manchurian Recipe

Gobi Manchurian or cauliflower Manchurian is a delicious Indo Chinese dish made with fresh and crunchy cauliflower.it is a vegetarian favorite dish usually serving with fried rice or noodles.

Deep fried cauliflower is tossed in a flavorful tomato,chili, garlic and soy based gravy then garnished with spring onion.This is a very easy to make and delicious Indo Chinese dish and a favorite of vegetarians.

I would like to give some tips before moving to the preparation method.

How to choose fresh cauliflower?

Cauliflower is a delicate vegetable so always choose a fresh, firm and tightly closed cauliflower with fresh green leaves.choose one with white color with out any blemishes and black or brown spots,too black brown or yellow spots says it is not fresh.

How to clean and prepare cauliflower?

With the help of a sharp knife remove the stem of the cauliflower,peel off the leaves from the bottom.The separate the florets one by one big or small based on your requirement.

How to wash and clean cauliflower before cooking?

cauliflower must be cleaned well before cooking because it contain lot of dirt and tiny insects,and pesticides,that needs to be removed carefully.

For cleaning cauliflower take a large pan, fill it with water and boil it,then add little salt and turmeric powder to the oiling water,then add the cauliflower in to it,boil for one or two minutes,then immediately drain the water and wash the cauliflower with ice cold water.dry with a paper towel.Now the cauliflower is ready to cook.

How to store cauliflower?

Keep cauliflower loosely wrapped with plastic. then keep it in the crisper drawer of the refrigerator.

if you want to keep it for more than one week you can keep it in the freezer.For that prepare florets and spread it in a tray then place it in to the freezer.once it become frozen transfer it in to a freezer bag,seal tightly and place it back to the freezer,make sure the freezer temperature is well maintained.

So here is the recipe of easy and simple gobi manchurian try it and enjoy with fried rice

click here for the video recipe of Gobi Manchurian

Print Recipe
Restaurant style Gobi Manchurian Recipe
Restaurant style Gobi Manchurian Recipe or cauliflower Manchurian is a delicious Indo Chinese dish made with fresh and crunchy cauliflower.it is a vegetarian favorite dish usually serving with fried rice or noodles.
Restaurant style Gobi Manchurian Recipe
Course Entree
Cuisine Chinese
Prep Time 10 minutes
Cook Time 20 minutes
Servings
people
Ingredients
  • 600 g cauliflower
  • 6 tbsp plain flour
  • 5 tbsp corn flour
  • salt
  • water
  • For making sauce:-
  • 1 onion chopped
  • 1 tablespoon chopped garlic
  • 3/4 tablespoon chopped ginger
  • 2 green chili seed removed and chopped
  • 3/4 tbsp spring onion white chopped
  • 3/4 tbsp celery chopped
  • 1 tsp sugar
  • 1 tsp kashmiri chili powder
  • 1 1/2 tablespoons soy sauce dark
  • 1 tablespoon red chili sauce
  • 1 1/2 tbsp tomato sauce
  • 3/4 tablespoon corn flour mixed in 4-5 tbsp water
  • water 3/4 cup
  • spring onion greens chopped 4tbsp
  • 0il for deep frying
Restaurant style Gobi Manchurian Recipe
Instructions
  1. With the help of a sharp knife remove the stem of the cauliflower,peel off the leaves from the bottom.Then separate the florets one by one big or small based on your requirement
  2. for cleaning cauliflower take a large pan fill it with water and boil it,then add little salt and turmeric powder to the boiling water,then add the cauliflower in to it,boil for one or two minutes,then immediately drain the water and wash the cauliflower with ice cold water.dry with a paper towel.Now the cauliflower is ready to cook
  3. in a medium size bowl add add corn flour,plain flour,and salt.Add water little by little and make a smooth lumps free batter
  4. add the cleaned florts to the batter and coat well;
  5. heat oil in a deep frying pan over medium heat.oncethe oil become hot add cauliflower florets and fry them batch by batch.then transfer to a kitchen towel and keep aside
  6. mix 3/4 tbsp con flour in a half cup of water and keep aside
  7. heat oil in a non stick wok add the chopped garlic and saute well in a high flame. Then add ginger saute well then add onion.
  8. once onion become translucent add sliced green chili and spring onion white.then saute in a high flame add little salt,now reduce the flame and add 1 tsp chili powder(this is purely optional)mix well.
  9. then add chili sauce,tomato sauce and soy sauce,mix well and add one tsp sugar and mix well.if you are making a dry version now you can add the fried gobi and mix well,then garnish with spring onion greens .serve hot with fried rice or noodles).
  10. if you are preparing a gravy version add 3/4 cup of water into the sauce let it boil then add 3 to 4 tbsp of cornflour mixture in to it.let the sauce become thick. then add fried gobi mix well.then add chopped spring onion greens and mix well.
  11. switch off the stove transfer to a serving bowl.serve hot with fried rice or noodles.
Beef Ularthiyathu or Kerala Beef fry

December 23, 2018 Kerala special

Beef Ularthiyathu or Kerala Beef fry

Hi friends lets say a big hi to this super tasty and delicious Kerala’s own Beef fry, locally called beef Ularthiyathu or pothirachi Ularthiyathu .This Malayali Beef fry is so delicious and a must try dish.Beef cooked in a spicy pepper based masala then seasoned with coconut flakes and curry leaves

Kerala is one of the few states in India where beef plays a prominent role.There are many variations of beef dishes in Kerala and this Beef Ularthiyathu or beef fry is a favorite among all .This is a must try dish, its full of flavors and finger licking good.

Fresh and tender meat slow cooked in a heavy bottom vessel with chili, coriander,Turmeric,fennel seeds,pepper and ginger garlic,then stir fried along with curry leaves and coconut fakes.This is the most delicious beef dish I have ever tasted.Coconut oil and coconut flakes are the key ingredients of this recipe.The smell itself mouthwatering ,each bite is heavenly.

This takes a little time to prepare if you are using a traditional oven but if you are using a pressure cooker you can easily cook the beef,then you need to roast the beef with coconut flakes and curry leaves.Remember the more the beef is roasted the darker the color and riches the flavours.

This is a pure Kerala Christian dish,traditionally serving with boiled matta rice and moru curry ,especially in special occasions. But now a days its available in all hotels and mostly people enjoying it with Kerala parotta.

So here is the recipe enjoy this delicious Pothirachi Ularthiyathu or beef roast or Kerala beef fry or Malayali beef roast or beef dry fry.

Print Recipe
Beef Ularthiyathu or Kerala Beef fry
Beef cooked in a spicy pepper based masala then seasoned with coconut flakes and curry leaves
Beef Ularthiyathu or Kerala Beef fry
Course Appetizer, Entree, Main Course
Cuisine Indian, Kerala, South Indian
Keyword Beef fry,Kerala Beef Fry.Pothirachi Ularthiyathu,Kerala Beef Roast
Prep Time 10 minutes
Cook Time 15 minutes
Passive Time 30 minutes
Servings
People
Ingredients
For the Beef
  • 850 gram Boneless Beef cut in to small pieces
  • 2 tbsp coriander powder
  • 1 tbsp kashmiri chili powder
  • 1 tbsp black pepper finely crushed
  • 3/4 tsp turmeric powder
  • 1 pod garlic paste grind in to fine paste
  • 1 medium piece ginger grind in to fine paste
  • 1 tbsp fennel powder
  • 1 star anise
  • 1 small cinnamon stick
  • 3 cloves
  • 1 bayleaf
  • 10-15 Madras onion (shallot)
  • 3-4 green chili
  • 1 tbsp white vinegar
  • salt as needed
For the Tempering
  • 1 onion sliced
  • 1 pod garlic lightly crushed with skin
  • 1/2 cup coconut flakes/shavings
  • 3-4 sprig fresh curry leaves
  • 2 tbsp coriander seeds finely crushed
  • 1 tbsp Red chili flakes
  • 1/4-1/2 cup coconut oil
Beef Ularthiyathu or Kerala Beef fry
Instructions
  1. Clean beef and wash well under runningg water.then drain well
  2. In a pressure cooker add the beef,small onion,chili powder,coriander powder,turmeric powder, fennel powder,pepper powder, ginger garlic paste and curry leaves.Then add cinnamon,star anise,bay leaf,vinegar, salt and two sprig of curry leaves in to it.then mix well with your hands.Cover with the lid and cook over a medium flame with out adding any water,approximately 3-4 whistles depends on the quality of beef.Then switch off the stove and let the pressure goes naturally. (if you are cooking the beef in a normal vessel add sufficient amount of water to cook the beef it will take approximately 60-70 minutes)
  3. Then heat a heavy bottom vessel preferably Uruli over medium flame,Once the vessel become hot add 1/2 cup coconut oil,Once the oil become hot add coconut flakes and fry till brown then remove from pan and keep aside.
  4. Then add crushed garlic in to the oil fry until it become light brown.then take it from oil and keep aside with fried coconut flakes.
  5. Then add curry leaves in to the oil stir well and add sliced onion in to the oil saute until onion become transparent,then add crushed chili and coriander seeds in to it sate until onion become light brown.
  6. Now add the cooked beef in to it along with the gravy.saute well until dry over medium flame.once the beef become dry add coconut flakes and garlic,check salt consistency add more if needed.Then reduce the flame and continue roasting until beef become dark and brown.you can drizzle coconut oil in between if required.
  7. Once done enjoy with Kerala parotta or with rice and moru curry.
Easy Five ingredient Pan Grilled Prawns

June 18, 2017 Easy

Easy Five ingredient Pan Grilled Prawns

Hi friends hope you are all doing well,today I am here with a recipe of Easy Five ingredient Pan grilled prawns .An easy to make grilled prawns with five basic ingredients.This prawns are delicious, juicy and flavorful. I made this with IL Ponte Extra Virgin Olive Oil.This  is a perfect accompaniment for your weekend dinner.

this is a must try prawns recipe, made with very few ingredients and the cooking time is less than 30 minutes.Prawns marinated in chili powder, turmeric powder, lemon juice, olive oil, salt and ginger garlic paste,then pan grilled in healthy IL Ponte Extra Virgin Olive Oil.


Do you know guys olive oil is very good for health.It contains lots of anti oxidants,which help to lead a long and healthy life.Olive oil reduces the risk of heart attack and it has the capacity to lower blood pressure.Usually I am not using cooking sprays,Most of the cooking sprays are loaded with chemicals.But when I tried this IL Ponte Olive Oil cooking spray I really loved it. it is very flavorful and easy to use.


Olive oil has lower a smoke point than other oils,So it is not good for deep frying,but Extra Virgin Olive Oil is good for salads and sauteing.It is very suitable for Indian cooking as it has high smoking point when compared to other type of olive oils.

These prawns are very easy to make try it and serve with some fresh home made Mango salsa,the combination of grilled prawns with mango salsa is just amazing so try this I am sure you will like it.


Print Recipe


Easy Five ingredient Pan Grilled Prawns

Easy five ingredient pan grilled prawns:-A very easy to make and delicious Prawns recipe.Prawns Marinated in Chili powder,Turmeric powder Ginger Garlic paste ,Lemon juice and salt ,then pan grilled.perfect as a starter or appetizer or serve as a main course.

Easy Five ingredient Pan Grilled Prawns

Course Appetizer, Entree
Cuisine Asian, Indian

Prep Time 15 minutes
Cook Time 8 minutes

Servings
people


Ingredients
  • 1 IL Ponte Olive Oil Cooking Spray Extra Virgin Olive Oil
  • 12 nos Prawns peeled and deveined
  • 2 pinch turmeric powder
  • 1tbsp lemon juice
  • 1/2 tsp Red chili flakes
  • 1/2tsp Red chili powder
  • 2-3 nos curry leaves crushed
  • 1/2tsp ginger garlic paste
  • salt as needed
  • 3 nos bamboo skewers soaked in cold water for 1 hr

Easy Five ingredient Pan Grilled Prawns


Instructions
  1. Combine all the ingredients in a medium size bowl,add 2 sprays of olive oil and make a fine paste.

  2. Marinate prawns with this paste and cover the bowl with a cling film.Keep aside for 15 minutes.

  3. thread the prawns on to the skewers

  4. heat a large non stick frying pan or grill plate over medium heat spray with the IL Ponte Olive Oil

  5. cook the skewers for 8 minutes or until cooked through. Turn in between and spray generously with the olive oil on each turn

  6. serve hot with mango salsa

June 9, 2016 Dairy Free

Pathiri-Authentic Malabar Bread

Pathiri is a traditional and authentic South Indian bred and very popular in the Malabar region of Kerala.it is a perfect gluten free,vegan and zero oil rice bread usually serving with curry or coconut milk. Making pathiri is very easy, you need only three ingredients,tightly roasted rice flour,water and salt. Pathiri is traditionally making in pathiri chatty or oadu….

Read More

Chicken Vindaloo Recipe

December 23, 2015 Indian Curry Recipes

Chicken Vindaloo Recipe

Today I am sharing Chicken Vindaloo Recipe,the sweet,sour and mild  hot Indian curry dish, very popular in Goa.This pickle like mustard flavorful curry is my all time favorite.


…

Read More

Mushroom biriyani

July 29, 2015 Easy

Mushroom biriyani


hi

hope you are all doing well.Today I am sharing the recipe of mushroom biriyani.

mushrooms are widely available here with a low price,and we all like mushrooms,so it’s a part of our every day meal.Mushrooms are highly nutritious and a rich source of minerals and vitamins,this is a simple and easy biriyani recipe,and not time consuming like other non veg biriyanis….

Read More

  • Page 1
  • Page 2
  • Go to Next Page »

Primary Sidebar

Subscribe for updates

About Me


Hi welcome to sujis cooking, I am Sujitha from Kerala South India, now live in Dubai with my husband Ratheesh and little one Aadhith. I love cooking mainly traditional Kerala and Indian recipes. And I would like to share some of my recipes which I have tried in my kitchen and liked by my family and friends. My recipes are mainly from my family and friends .some I have been adapted from magazines, cookery books and from other websites (due credits given)I am not a trained chef or expert just a house wife with a passion of cooking..I tried to give the exact measurement, however please adjust the measurements to suit your taste level. Hope you will enjoy these simple recipes. Thanks for visiting my blog. Happy cooking!

Lets Connect

  • Email
  • Facebook
  • Instagram
  • Twitter

Copyright© 2026 · Cookd Pro Theme by Shay Bocks


Loading Comments...